Intro
It was always difficult for me to make my mind whether to use Windows or Linux for my everyday life. I am used to windows since this is what used for a long time now, nevertheless, Linux had been a necessity for my research and academic work and I do like it as well. And simply there has been not enough time to fully migrate from one to the other. Accordingly, I had to live with both of them coexisting alongside each other.
However, I couldn’t also make my mind how to make them aside, whether to have Windows as virtual machine with Linux native installation, or the opposite way around, or even have them both native installed and have dual boot system (and suffer from the necessity to reboot every time I need to use the other OS).
The ultimate way is to have booth native installation on the HDD, and at the same time allow them to boot each other in virtual environment. and this is what I will try to explain here.
P.S. This was made possible only with the great help of others, please find the References at the end of the post.
Why Windows 10, Ubuntu 16.04 LTS, VMWare Workstation 12.0 Pro
Why these, well for a very simple reason:
- I have Windows 10 nativelly installed on my computer, provided by my university.
- I like Ubuntu. 😉
- Ubuntu 16.04 is the latest Long Term Support (LTS) distribution at the time of writing this post.
- I am still a STUDENT, so I get a free license to use VMware products 🙂
System Characteristics
Again, this is MY system properties, and the instructions listed here worked for this particular system, I have no guarantee whether it will work for other system settings/configurations. So, please, if you are going to try this, be informed that I take no responsibility on the success/failure of your setup.
- Single 512GB (actually, 476GB) SSD drive
- EFI based BIOS.
- Windows 10 Enterprise
- Ubunrtu 16.04 LTS
- VMWare Workstation Pro 12.1
Hard disk configuration:
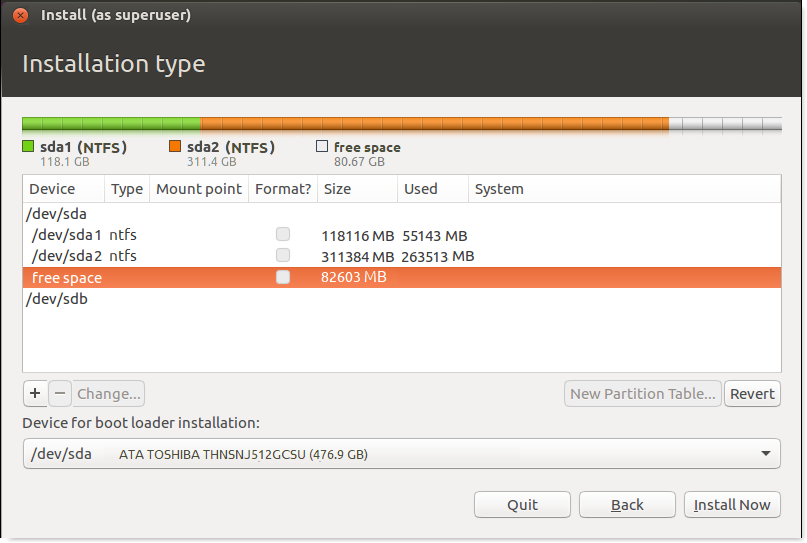
In my case, Windows was pre-installed on the hard disk, and with only one partition occupying the whole disk space, I had to resize the partition to free space, both for a new data partition for Windows and for the Linux installation. Eventually I created a new Data partition for windows (310 GB) followed by about 80 GB of free space.
One thing to keep in mind is the limitation of FOUR primary partitions. In my case I had only two partitions created for windows which both are primary, and then I am left with two partitions for Linux.
Further shrinking partition size with unmovable files:
While trying to decrease the Windows OS partition size I had the problem that the partition couldn’t be shrink beyond specific limit, this is due to system-locked files at the edge of the partition.
This applies when you receive the message: “You cannot shrink a volume beyond the point where any unmovable files are located”.
To overcome this problem I had to do the following:
1. Disable Hibernation:
Open command prompt (as Admin) and type powercfg /h off
2. Disable Pagefile:
- In the “Run” command, write SystemPropertiesPerformance.exe,
OR,
right click on “My Computer”, select “Properties” and then “Advanced system settings” - Click on “Settings” in the “Performance” section, then go to the “Advanced” tab, then click the “Change” button in the “Virtual memory” section
- Set “No paging file” for the partition you want to resize.
3. Disable System Protection:
- Same as the first step above to get to system properties, then select the “System Protection” tab.
- Select the intended drive, then click the “Configure” button and select “Disable system protection”
4. Restart
5. Resize the partition
6. Re-enable System Protection, Pagefile and Hibernate.
Installing Ubuntu 16.04
I will not cover how to install windows as I have it already installed. Just one point to mention:
After I made the previous harddisk partitioning, I just plugged the Ubuntu 16.04 USB boot drive (I created it using the YUMI multiboot USB creator)
After the first screen (install updates and third party apps…), we have to select the installation type. Here I selected “Something Else”, this will allow me to have the full control on how and where to install Ubuntu’s different parts.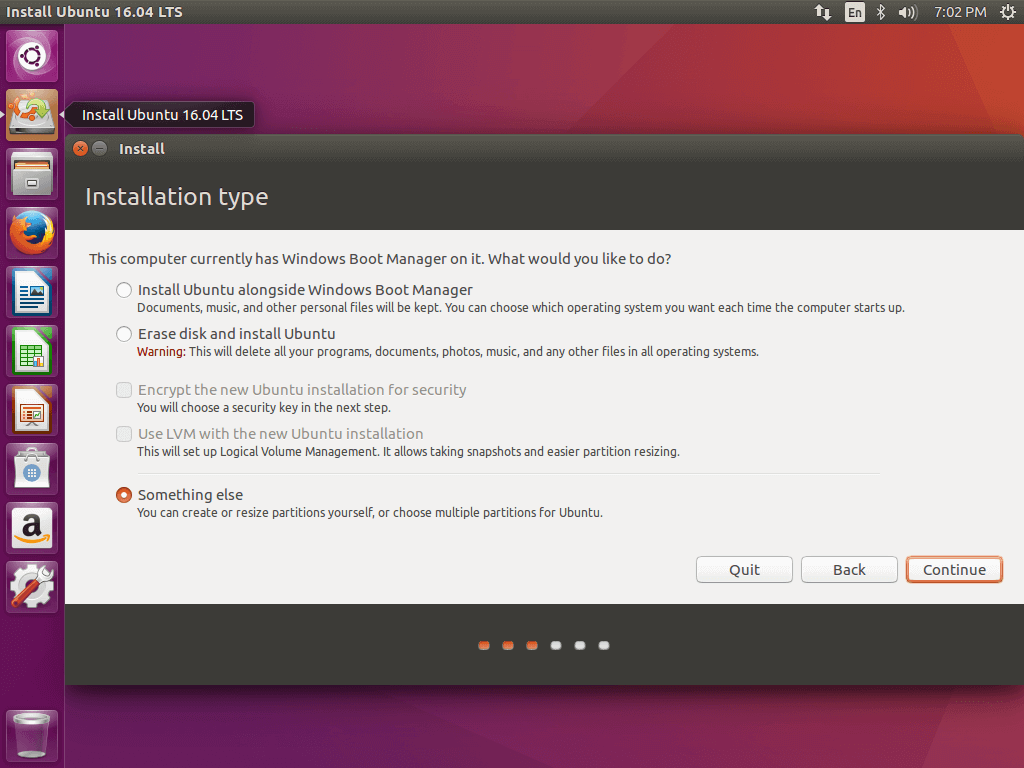
In the following window, all hard-drives with their partitions are listed. In my case “/dev/sda” is the harddisk I want to install Ubuntu onto. Also (as it is the only harddisk I have) this is where the Windows partitions (in this case /dev/sda1 and /dev/sda2) are, and it will also host the boot-loader (grub).
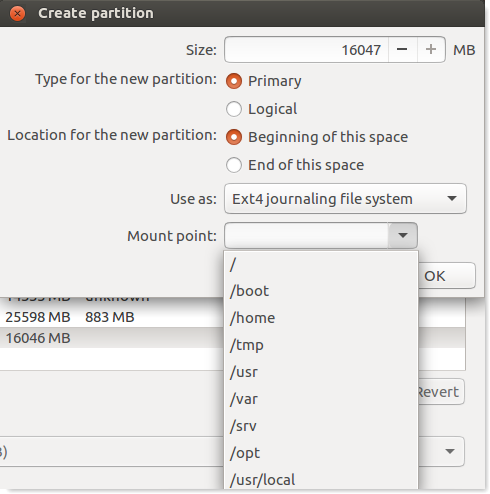
Here, I select the “free space” line and click on the “+“ button and the left-bottom side. This will allow me to create new partition. I repeat this step three times to create the following three partitions:
| Size | Type | Location | Use as | Mount point |
| 26.6 GB | Primary | Beginning | ext4 | / |
| 14.3 GB | Logical | Beginning | swap | |
| 25.6 GB | Logical | Beginning | ext4 | /home |
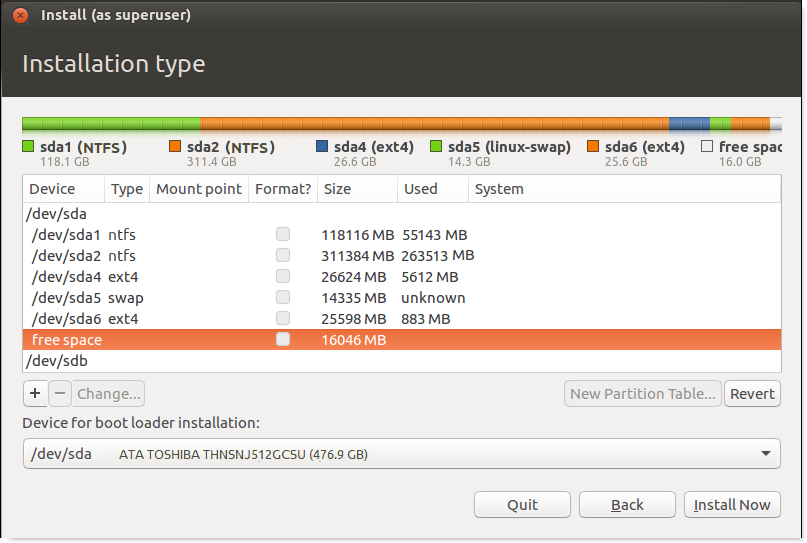
At the end, the partition map should something like the following:
With this been done, we proceed with the installation of Linux, remove the installation medium and restart the PC.
Now, instead of directly booting to Windows, the grub2 screen will appear with booting to Ubuntu 16.04 selected by default. to change this default behavior we need to modify the grub menu settings. this can be dine either manually through Linux terminal, or by using the grub-customizer
Grub Customizer:
Is a graphical tool for managing the Grub boot entries order and settings (timeout, defaults,…etc)
To install:
 sudo add-apt-repository ppa:danielrichter2007/grub-customizer
 sudo apt-get update
 sudo apt-get install grub-customizer
Virtual boot Ubuntu from Windows:
Now, having both systems installed and running. and having also VMware Workstation 12 installed, we can configure a virtual machine to start the native Linux installation virtually within Windows.
The main point here is that: both operating systems cannot use (or even access) the same partition together, BUT they can access the same disk drive together given that they access different partitions.
But, what about the boot partition, this may create a problem as both systems must have access to the boot partition on the HDD. The solution to this is by creating a small (actually very small) virtual
The solution to this problem is by creating a small (really small) virtual harddisk that will host the bootloader of the virtual machine, accessing the Linux partitions of the actual physical disk.
Creating a new Virtual Machine
The steps to create this virtual machine are as the following:
- In VMware Workstation, select “File -> New Virtual Machine” and proceed with the “Custom (advanced)” option, and “Workstation 12.0” compatibility profile.
- In the installation screen, choose “I will install the operating system later”.
Note: in fact we will be using the Ubuntu installation ISO file later, but if we select it here then VMware will automatically use the “Easy Install” feature that we don’t want. - Proceed with the configurations (Guest OS, Virtual machine name & location, processors, memory, network, I/O controller)
- When you arrive to “Select Disk Type”, choose SATA as this will be faster dealing with RAW physical disk partitions.
- At the “Select a Disk” step, choose “Use a physical disk (for advanced users)”
- Select the physical drive from the list (mine is PhysicalDrive0) and select “Use individual partitions” option
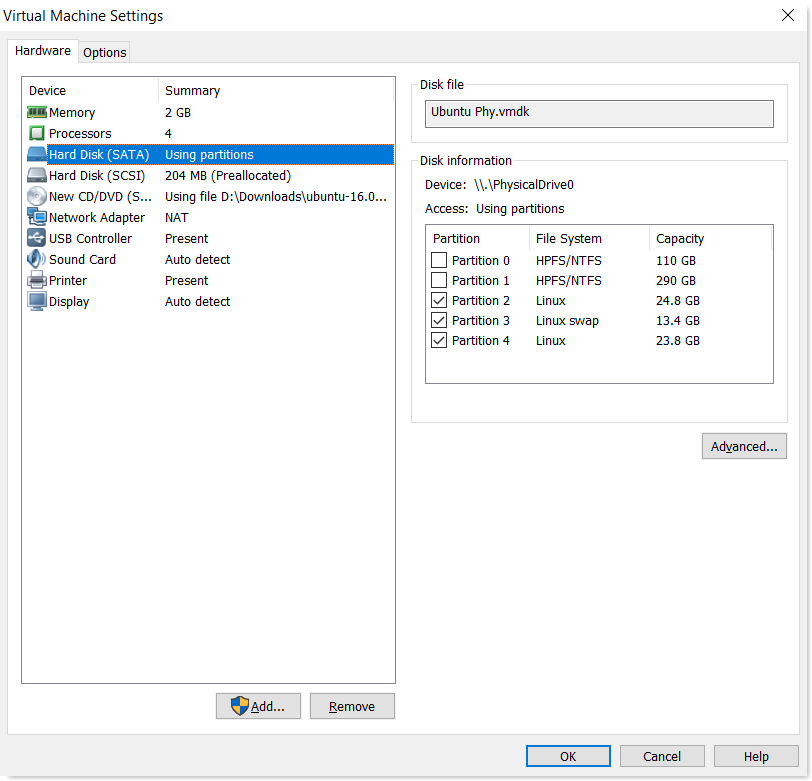
- From the partitions list, select ONLY the Linux partitions (in my case Partition 3,4 and 5) and give the disk file a name.
At this stage, we have created an un-bootable Ubuntu virtual machine. Now to boot into this machine we need to create a bootloader and save it on a virtual disk:
- Go and Edit the virtual machine settings
- Click the “Add” button and select “Hard Disk”
- Any of the types will work find, probably here SCSI will be easier so you don’t deal with SATA disk order and stuff.
- Choose “Create a new virtual disk” and allocate a maximum of 200 MB (i.e. 0.2 GB) as a disk space, give the disk a name and close the wizard.
- Click on the CD/DVD entry in the Hardware devices, and select the ISO file of the Ubuntu installation disk.
Now, the Virtual machine is ready to start. When you boot the virtual machine, VMware will find no bootloader on the HDD so it will proceed to boot from the CD image file.
After you boot into Ubuntu, DO NOT INSTALL. Just proceed to the desktop, open a terminal window and start writing commands
Preparing the grub bootloader
First, we need to create a new partition in the virtual disk we have created. This partition will serve as the boot partition for the virtual machine.
In my case, the virtual disk was /dev/sda and the physical disk was /dev/sdb. Make sure you are using the correct reference to the disk by listing all available disks/partitions using the “ls /dev/sd*” command
In the terminal window, write the following commands:
 sudo parted /dev/sda mklabel msdos
 sudo parted /dev/sda mkpart primary ext2 0% 100%
 sudo mkfs.ext2 /dev/sda1
This will create a new partition”sda1″ of type “ext2” occupying the whole “sda” disk space and give it a name “msdos”.
Afterwords, we need to prepare the partition for chroot access by setting it up with a particular linux folder/file structure. This is accomplished using the following set of commands:
 sudo mkdir /mnt/chrootdir
 sudo mount /dev/sda1 /mnt/chrootdir
 for dir in proc dev sys etc bin sbin var usr lib lib64 tmp; do
     sudo mkdir /mnt/chrootdir/$dir && sudo mount --bind /$dir /mnt/chrootdir/$dir
 done
After we have done that, now we can chroot to the partition and install/update grub loader onto it.
 sudo chroot /mnt/chrootdir
 sudo grub-install /dev/sda
 sudo update-grub
Voilà, It is done. now we can boot into the native Ubuntu virtually from within windows, no annoying warnings or error messages.
Useful tools
In different stages of the setup, I tried and used the following tools, some of them solved problems or may be useful to solve other problems.
Linux Boot-Repair:
A simple tool to repair frequent boot issues you may encounter in Linux GRUB/EFI.
To install:
 sudo add-apt-repository ppa:yannubuntu/boot-repair
 sudo apt-get update
 sudo apt-get install -y boot-repair
References
I would like to thank the following posters who where a great help to me:
Run your dual-booted Ubuntu install under Windows with VMWare
Install Grub Customizer in Ubuntu 14.04 to Manage Your Grub Bootloader
How to shrink a disk volume beyond the point where any unmovable files are located
http://www.vmware.com/pdf/dualboot_tech_note.pdf
http://lifehacker.com/how-to-dual-boot-and-virtualize-the-same-partition-on-y-493223329
http://www.virten.net/2014/12/howto-usb-boot-a-vm-in-vmware-workstation-11/
https://ubuntuforums.org/archive/index.php/t-1647648.html

